For the purpose of describing only the cabinet refacing process we have left out any reference to replacement of doors and drawer fronts. Although this is also a major part of any refacing project, the options are numerous and can be better dealt with by those companies that sell replacement doors and fronts.
Download a Printable PDFPrepare Cabinets Boxes For Refacing
-
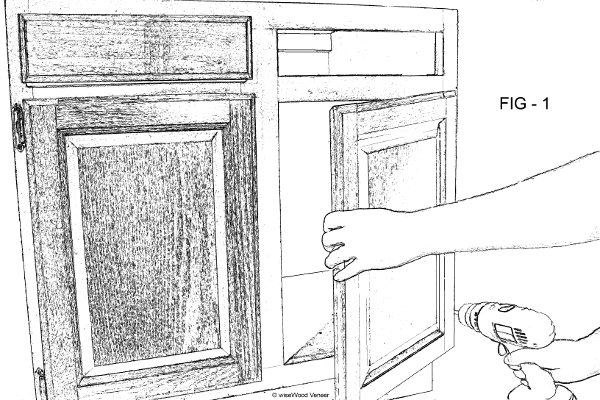
Figure 1: Remove cabinet doors and hinges. Remove doors and hinges. If planning to re-use any hardware keep hinges and screws together in a safe place. (FIG – 1)
- Remove any trim molding by using a stiff putty knife or small tack puller under the edge of the molding and gently pry loose.
- Remove complete drawer boxes and set aside in a safe area.
- Now you’re down to cabinet boxes only. Inspect frames for any loose or peeling surfaces and repair these as well as any deep dents or scratches. These can be filled with wood putty or even better, auto body filler (Bondo) and sanded smooth.
-
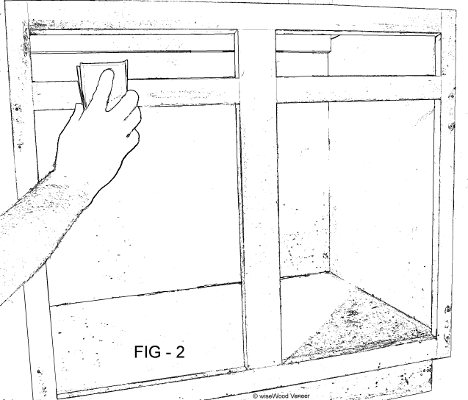
Figure 2: Lightly hand sand all surfaces of cabinet. Lightly hand sand all surfaces with 120 grit sandpaper and a sanding block. You just want to “scuff” the surface, not completely remove the finish down to bare wood. Don’t use a power sander for this purpose. (FIG – 2)
- Wipe down all surfaces with a mild detergent and water solution or a mild solvent like denatured alcohol. Use a damp cloth only so as not to soak or saturate the wood and allow ample drying time. After surfaces are completely dry wipe with a tack cloth to remove any remaining dust or particles.
Veneering End Panels
Your kit comes with 2 different types of veneer, sheet veneer with a PSA (pressure sensitive adhesive) backing and rolled edge banding with a hot melt adhesive backing.
-
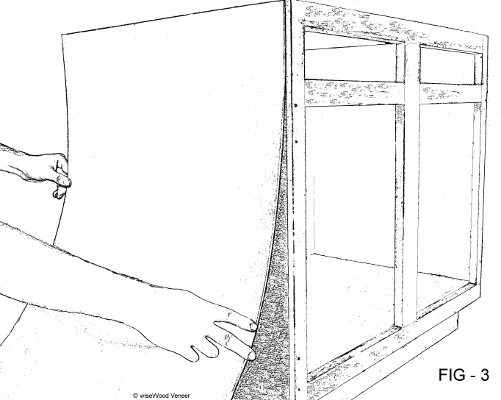
Figure 3: Apply PSA backed wood veneer to exposed end panels. You will start veneering cabinets by first applying PSA veneer to any exposed end panels. (FIG – 3) The wood edge banding will be used on the inside edges of the face frames around door and drawer openings.
- For the end panels take careful measurements for height and width. Cut the veneer width to the exact size and cut the height about an inch over sized using a good square and straight edge. Usually the face frames on cabinets extend an 1/8″ or so beyond the cabinet end panel so you’ll be fitting this veneer between the backside of the face frame and the wall. By leaving the tall dimension of the veneer extra long you’ll have some free play when trying to align and place this end piece. After the veneer has been cut to fit this panel you will want to dry fit it before removing the release paper and exposing the PSA glue surface. The face frame overlap gives you a good edge to register the veneer against. When you’re satisfied with the fit you are ready to move on to the next step and apply the veneer.
-
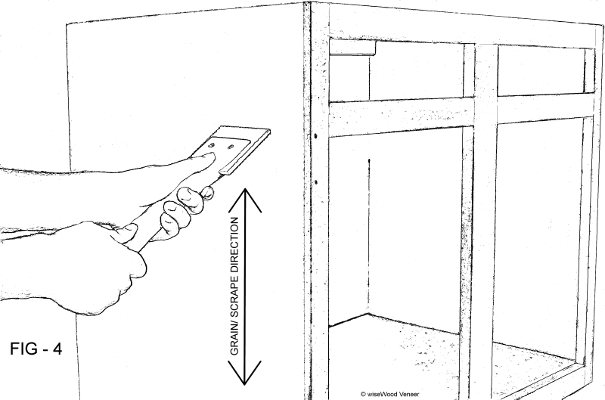
Figure 4: Smooth panel by applying pressure to veneer scraper along the grain. Peel away a few inches of release paper on the front edge to expose the adhesive. Register the veneer to the top or bottom of the end panel and butt up tight to back of the face frame. With the veneer placed where you want it, apply light pressure by hand to the surface along the leading edge where you’ve exposed the glue surface to effectively anchor the piece and prevent movement. Now you can reach behind with one hand to pull back the release paper while smoothing the veneer surface with the other hand as you go. With the veneer firmly affixed, smooth with the veneer scraper while applying downward pressure, moving in the same direction as the grain. (FIG – 4)
- Inspect the surface for any bubbles or loose edges. If any of these conditions exist go back over these areas with the veneer scraper.
- Repeat this process on any exposed cabinet ends.
Veneering Inside Edges
The edge banding supplied with your kit utilizes a hot melt adhesive backing. In these steps you will need a standard household iron or smaller travel sized iron to activate the hot melt adhesive used to apply the edge banding.
- Begin by measuring the height and width of your cabinet opening. From the roll of edge banding cut strips of veneer approximately 1/2″ longer than the measurements taken for the cabinet opening. You will have 4 strips for each opening, 2 for the sides and one each for the top and bottom edges.
- The edge banding supplied is 7/8″ wide which leaves you a generous amount of excess for covering the inside edges. Start with a single cut-to-size strip and your iron set on a medium heat setting. You can begin on a side, bottom or top, whichever you are more comfortable with. Align the veneer strip so the excess width is hanging over the front edge of the face frame. This will help save time as you will now only have to trim excess veneer from the front side of the face frame and not from the inside of the cabinet.
-
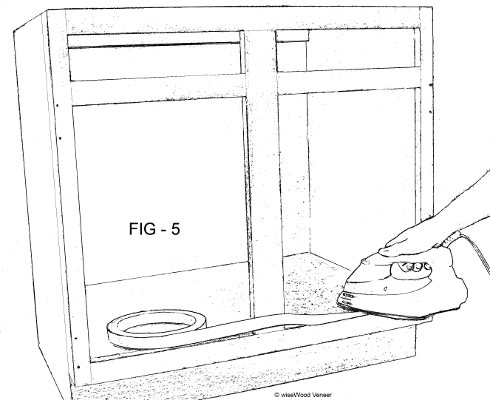
Figure 5: Iron on the pre-glued edge banding. Starting at the end of the strip, apply heat with the iron directly on the face of the veneer. Within a few seconds you’ll feel the glue under the strip melt and become viscous. Move the iron along the edge with downward pressure for about 6 inches, aligning the back edge as you go. (FIG – 5) Remove the iron after this short distance and allow the glue a minute or so to cool. Once cooled you have effectively anchored this strip and can continue down the remainder of the edge activating the glue as you go. Because your veneer strips are cut extra long you will need to trim the excess length as you reach the end. This can be accomplished with a sharp utility knife or a very sharp wood chisel cutting across the grain. After a few minutes check the entire edge for any loose spots or front and back edges that may have not sealed down properly. In the event you have any loose edges simply go back over them with your iron and more pressure. You can use the iron to heat problem areas then use the veneer scraper to apply pressure to the edge banding while it’s still warm.
- Repeat these steps for the remaining edges until you’ve covered all the inside edges of the opening.
-
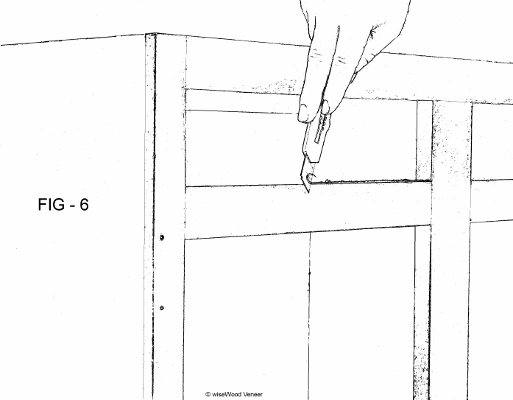
Figure 6: Carefully trim away excess wood veneer. With the edges of the entire opening covered you are now ready to trim the excess veneer flush with the front of the face frame. You can accomplish this with a sharp knife edge or sharp wood chisel held at a slight angle, not perpendicular, to the front surface of the face frame. By holding your cutting tool at a slight angle and not flush to the surface of the face frame, you will avoid gouging the adjoining surface. For best control use short strokes with your knife or chisel blade and take your time. (FIG – 6) Don’t be concerned if you leave a little excess or don’t have a perfectly smooth edge as this will be addressed in the next step.
- To get that final finish to the inside edges use a sanding block with 120 grit abrasive. Sand just the front edge with the sanding block at a slight angle to produce a slight bevel and create a smooth flush edge. Run your fingers along the surface to check for any sharpness or loose grain that could snag and tear out. When this front edge is smooth and flush you’re ready to move on!
Veneering Rails and Stiles
The next step is to apply PSA veneer to the cabinet face frame stiles and rails. The stiles are the vertical (left and right) side members and the rails are the horizontal (top and bottom) components of the face frames. When veneering these surfaces do one complete opening at a time then move on to the next opening. There are two schools of thought about veneering the stiles where two cabinets adjoin each other. You can cut either one wide strip of veneer to cover the stiles of both cabinets together or, cut 2 individual pieces and cover each cabinet stile separately where they butt together. If the cabinets are aligned properly then one wide strip covering both is fine. If the cabinets are poorly aligned and the surfaces don’t line up flush then you may have to cut two separate veneer strips and cover each stile separately. The downside to this method is making sure you cut a very straight edge and aligning the veneer strip perfectly flush on the edge of the stile where it abuts the other cabinet. You will not be able to trim this edge easily but if you have cut a nice straight edge and aligned it carefully you won’t have to trim anything.
- Measure the rails and stiles then cut veneer strips for each one. Cut your strips 1/2″ wider and 1″ longer than the actual dimensions using a sharp razor knife and a good straight edge. NOTE: Once you are more comfortable with your measuring and cutting skills you don’t have to cut strips with as much excess but it’s advisable to start with generous measurements.
-
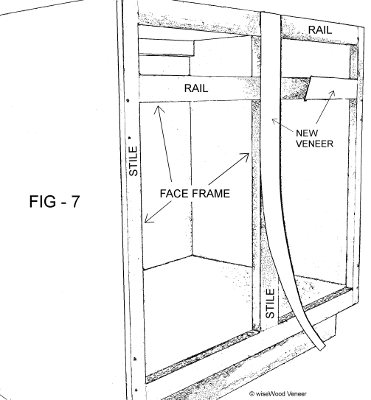
Figure 7: Apply veneer to stiles first, then rails. Apply the stiles first. Starting at the top, peel back a few inches of the release paper to expose the glue surface. Align the top of the strip with the top edge of the face frame and position so there is an even overlap on both sides of the stile. Apply light pressure to the strip to anchor it in place and visually check down the length of the strip for proper alignment. When satisfied with the alignment, begin peeling back the release paper with one hand while smoothing and applying light pressure along the rest of the strip with the other. Repeat this same procedure for the other side. NOTE: If you are confident in your ability to cut a straight line and position the strips accurately along an edge, you can position so all of the excess veneer overhangs the opening of the cabinet. This will eliminate having to trim excess veneer from both edges. Not everyone will be comfortable with this but it saves time and the result is the same. (FIG – 7)
- Apply veneer to the rails next. Peel back a few inches of the release paper to expose the adhesive backing. Position the veneer strip so it overlaps the veneer on the stiles evenly on both ends and has an equal amount of overlap on both sides of the rail. Again, press lightly to set the strip and continue to smooth the veneer as you remove the backing paper. Repeat this same procedure on the opposite rail. NOTE: Here again if you want to save a little time and effort you can position the strip flush with the bottom of the lower rail or flush with the top of the top rail and leave all the excess veneer overhanging the opening. Having to trim only one edge saves time and potentially a mistake.
Trimming Rails and Stiles
- Trim your stiles first. Using your razor knife and the inside edge of the stile as your guide, begin trimming away the excess veneer from the inside edge of the cabinet opening. To prevent gouging or marking the inside edge of the face frame (which you’ve already veneered), I suggest skewing your knife blade at a slight angle rather than holding it flush against the inside edge. A 10 or 15 degree angle will prevent the knife blade from contacting the edge banding and seems to aid in cutting.
- Trim the excess veneer from the bottom of the lower rail and top of the upper rail with your razor knife, using the edge of the rail as your cutting guide. This will make the outside edges of your cabinet flush. This step may not be necessary if you originally positioned your veneer strip flush to begin with in previous steps. Trim the inside edges of the top and bottom rails just as you did the inside of the stiles, using your knife and the inside edge of the opening as a guide.
-
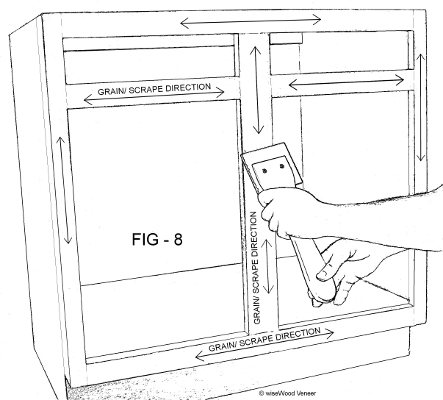
Figure 8: Use wood veneer scraper to apply pressure in direction of grain. Now that you’ve got the inside of the opening and top and bottom edges all trimmed flush, the last thing that needs to be trimmed is the overlapping veneer from the rails covering the stiles. Using a good straight edge, align it with the inside edge of the stile and extend it over the rail where it meets the stile. Using the straight edge as your guide, perform a double cut through both the rail and stile veneer strips. It’s best to score this cut 2 or 3 times to slice through both layers of veneer. Remove the excess veneer from the rail by getting the edge of your knife under it and lifting it off. Now, with the tip of your knife under the edge of the rail strip, carefully lift the veneer off the rail and remove the excess veneer from the stile. Once this piece is removed you can place the rail strip back down and smooth it down by hand. The rail and stile veneers should join perfectly and should be flush. Repeat the same procedure on the remaining 3 corners.
- With all veneer strips in place and trimmed flush, use the veneer scraper to smooth each surface, applying downward pressure while moving the scraper with the direction of the grain. (FIG – 8)
- With your sanding block and 120 grit sandpaper, sand the inside and outer edges of the new veneer so everything is smooth and flush with edges of the face frame.
Prepare Cabinets for Finish
- We recommend waiting 24 hours before you apply any finishes to your newly re-faced cabinets. Even though all of our veneers are production sanded it’s necessary to properly finish sand them to achieve the best results. Start with the 150 grit sandpaper and your sanding block and sand all surfaces to remove any marks or residue on the surface of the veneer. Pay close attention to the edges where the PSA veneer meets the edge banding. This is an area where you may have some glue residue or squeeze out from the hot melt adhesive. After you’ve sanded all surfaces with the 150 grit paper repeat the same process with 180 grit sandpaper.
-
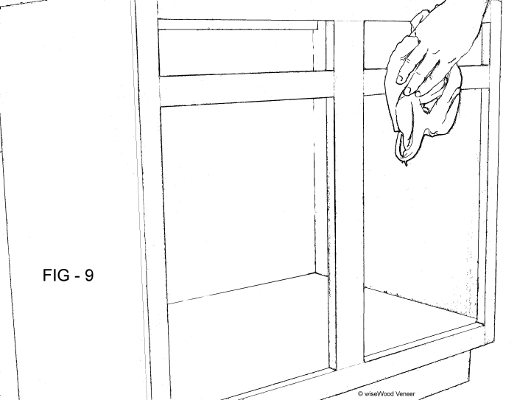
Figure 9: Wipe off dust with dry rag and follow up with a tack cloth. After completing all of your sanding wipe or brush off the dust with a dry rag or brush. Now that you’ve removed the majority of sanding dust, follow up with the tack cloth to remove any fine dust left on the veneered surfaces. (FIG – 9)
- The preferred stains and clear finishes for veneer products are oil or solvent based. Water based stains and finishes can be used but should be tested on a sample board first to gauge any adverse reaction with the veneer. It’s important to remember that moisture causes wood to expand. If there are any flaws or weaknesses in your glue line this expansion could cause delamination or bubbled veneer.
- No matter what type of stain or finish you use you should always follow the manufacturer’s instructions. Stains and finishes should be used sparingly and not allowed to sit on the surface too long. It’s always preferable to use multiple light coats of stain or finish instead of heavy, wet coats. Never saturate a veneered surface with stain or finish or allow it to sit or pool on the surface. Always wipe excess immediately.
Want to print the application instructions? Download a printable PDF here.